The Case Bottom

The bottom of the NES case has several apertures on its right half that could accommodate extensions to the PC's ports --
- two in the front (at bottom right in the image above),
- two on the side (upper right corner), and
- three in the back (top right).

Centered(-ish) at bottom is a detachable cover that opened to a port on the underside of the main board, perhaps for technicians to access. One also notices a series of channels, about a half-inch wide, which all lead to this spot. From this angle, one might think these channels are about airflow.
I intend to leave the power and reset buttons in place for aesthetic reasons.
Bonus points if I can actually connect the power button to the power switch on the case.
Super-ridonculous bonus points if I can get the lamp to work too.
I think my best bet for placement of the mini PC is in the area where the openings are, because the apertures offer access to ports, and because it is the largest area of the case bottom the PC might fit into.
If setting the PC down into this area doesn't work, I may be able to build a platform for the PC to rest on.

Well, What Had Happened Was...
The mini PC unit arrived this morning. I found it was not going to fit in the area I'd hoped it would. So I went with my next option, which was to create a platform to use the support of the three narrow raised areas that seem to join at that mysterious port opening.
Considering I'm working with a plastic case, I needed to form that platform out of a similar material to have the best chance at adhesion. My economical answer: plastic building blocks and a liquid adhesive (the kind that sticks fingers together effortlessly and quickly).
After some careful measurements (cough) I came up with the design pictured above.
I didn't cut down the raised "towers" because I didn't have to AND some are perfectly positioned to hold the mini PC in place.
The Infamous Mini PC
I'm amazed by it and I haven't even powered it up yet
Measuring 4.25" x 4.5" x 1.75" (approximately), I'm in awe of this wee powerhouse. Perched on the raised areas inside the bottom of the case, it's only 2.5" tall, leaving plenty of "headroom" inside the assembled enclosure.
I have USB 3.2 extension cables on order which I hope to mount in the space once occupied by a controller, and a pair of right-angle HDMI extenders which I hope to mount in the other. I've retained the controller ports in case I need to try to dremel out the port part to retain the housing, but I suspect fashioning a mounting plate out of something else would be easier.
As you might imagine from the images with the building blocks, a few of the blocks are built up with the intention of holding the computer in place. I'll be lining the bits facing the computer with an appropriately padded material to preserve the machine's finish and hold it more tightly.

NES Console Power Lamp
A bright idea
I cut the plug off of the end of the several wires that connected the power and reset buttons to the main board, and wired them one-at-a-time to an unterminated USB cable until I found a combination which provided power to the lamp. I intend to plug it into one of the USB ports on the rear of the PC, so that when the PC is powered up, the console's power lamp will be lit.

Mini PC USB Ports Access
Ports is Ports
Reference to an old Wendy's ad there. So I took apart the controller port mounts on the front of the console, thinking I could squeeze the USB cables into one of those apertures. After a bit of dremeling I got the female ends shaved down enough to fit.
The computer has four USB 3.2 ports; two are on the front and two are on the rear. Since one of the rear ports will connect the console's power lamp, I may allow access to the other rear port through the back of the console.

Powering Up the Mini PC
A Powerful Solution
At first I was thinking about a mechanical solution that would depend on the NES Console Power button being pressed. A pair of metal straws "took one for the team" in that effort, which I believe was unworkable primarily because the stability of the rod could not be assured.
So then I considered an electronic solution instead, and decided on a "fingerbot" approach. A "fingerbot" is a clever term for a simple machine capable of operating wall switches or pressing buttons. So I thought I'd take a chance on a SwitchBot bot, and I couldn't be happier. The SwitchBot unit is able to power on the PC without need to breach the NES case in any way.
Mini PC Power, HDMI Ports Access
Ports is Ports, Part Two
With USB access from the front previously addressed, it was time to figure out how to access ports on the rear of the mini PC through the back of the NES. Specifically, HDMI and power.
Running power through the rear of the NES was always the plan. The power cable is a standard cylindrical 2.5mm/5.5mm DC cable which fits nicely through one of the three openings on the back.
The HDMI cable is another matter. At first I tried sitting it vertically in a rectangular opening, but it was just a hair too small to fit well, and I didn't really have a good option to lengthen it. Then I got the idea to file through the separation between the audio and video spaces on the right side toward the back. I built a bracket of sorts to help hold the cable in place in the new space. Besides -- truth in advertising here: HDMI handles audio AND video.
The Final Cut
Back to the Garage
Further refinement was needed to get the top and bottom halves of the case to meet as they should. I was able to overcome the vertical challenge by repositioning the fingerbot, but that brought its own challenges -- including, but not limited to, the need to saw off another small "tower". This one used to support the original board. With it out of the way, I could reposition the fingerbot to press the power button from the left, which dropped the height enough to allow the case to close tightly.
Can't Leave Well Enough Alone
Just a Couple More Things
I was pretty happy with the result. It sat on my desk for a few days as I worked through installing software and so forth.
Then I got to thinking... and that's when the trouble started. Again.
The first thing I wanted to address was an inefficiency: I had the console power lamp and the fan both only drawing power and plugged into separate USB ports. Solved that problem with a short splitter cable, making the other port available for the second thing I wanted to address, which was attaching a lightweight, 7-port USB hub to the back of the console.
The addition of the USB hub isn't mere goldplating. I'm building this out to replace my laptop, which has supported this hub for some time now. But adding the hub is a good idea anyway because there's no other way to conveniently access that available port.
Finally, one for pure aesthetics: I found a new replacement door (eBay) to replace this original with the faded text.
Sometimes, things need fixing
Small Change, Big Upgrade
A few weeks ago I noticed the power lamp wasn't lighting when the unit powered up. So this weekend I got back into the case and dug around a bit. Turned out the actual lamp -- the LED attached to the small controller board -- gave up the ghost.
Taking a closer look at that board, I noticed the transparent plastic piece that sits up against the case appeared to have a lip. With some careful prying I found there was a standard LED that was tucked into that plastic form.
So, all I did was replace the LED with a 5v lamp that I could wire to a USB cable, then swap the one wired to the controller board with this one. I got to pull out a bunch of spaghetti and now the machine gives a different vibe when it's powered up.
Sometimes, things need upgrading
A "Powerful" Upgrade
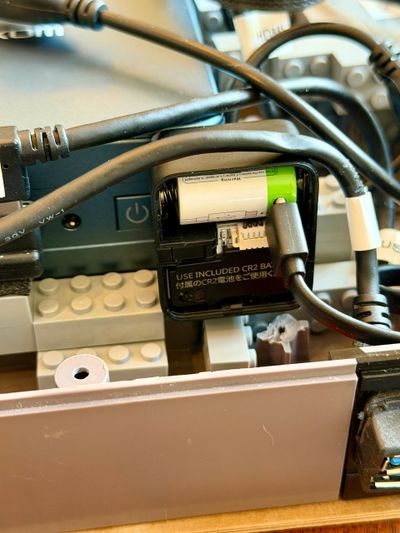
I've been putting up with having to power the unit up manually (I mean inserting a stylus to physically push the power button) because the battery inside the fingerbot failed. But then a few weeks ago, Switchbot announced an upgraded, rechargeable bot.
I installed it a couple of days ago. I was a bit disappointed to learn that the star of the show was a rechargeable battery, with no access from outside of the bot.
So what you see here is the battery jacked into a USB port on the back of the computer. My hope is this will continually refresh the battery and prevent the recurring need for powering the unit via "manual mode."